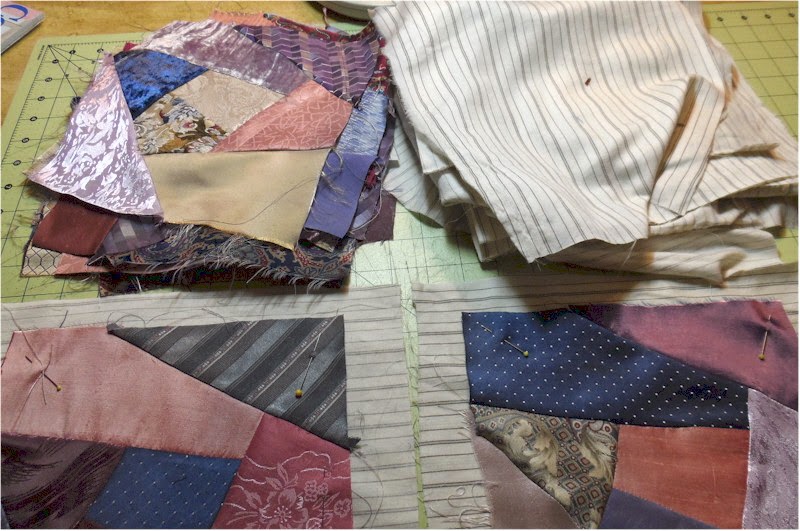
If I'm doing one block or larger blocks, sometimes I will flip and sew the patches to the foundation as I go. But when making so many blocks at once, I just piece the blocks as you see upper left and then put them on a foundation. For block foundation I LOVE old well-washed sheets.
Then I pin a block to the foundation and do a long stitch on the machine to hold it in place. If I had a machine which did zigzag I'd probably do that. But since my machine only does straight stitch... that works also. I always make my foundation at least 1-2" larger than the block because I often want to use a hoop.
I use home-made squares to mark my basting lines on the BACK of the block. I started cutting these squares out of old matt boards years ago and I now have every size from 6" to 12" in 1/2" increments. They make this part easier and I can recommend adding them to your list of tools. They come in handy for other tasks also... I use them over and over.
On the BACK of the block I trace the exact size of the finished block and inside that I trace the square that is 1/2" size smaller. I use two different colors and run a basting line along each line.
When you turn it over this is what you see.
This is one step that I do on EVERY block whether I'm working on it or if it's for an RR. I grit my teeth whenever I receive a block that has only allowed 1/4" seam allowance. First, we mostly use fabrics that fray and that edge is the most vulnerable point. Second, if there is NOT ample allowance outside the exact size of the block, you are continually having to handle the edges which can easily get soiled as well as frayed..
Without the inner line marked I see people beading right up to the edge of the actual block size...which means you will have to remove beads to finish off the block.
If I have not explained this well, please please please let me know and I will edit. I think that this step is that important.
 I only did a couple of the blocks tonight. Once they are at this stage it will be easy to finish the basting steps as I go along. I did start pulling my ring of thread colors I want to use. Next I will finish the images and think about the challenges I want to include....


.jpg)

7 comments:
Thanks for including this step. I wondered if you used the flip and sew method. Now the fun starts!
Merry Christmas
I really take this post to heart. I've definitely been one of those people that you would have gritted your teeth at...now I'll change my ways. :)
This post is HUGELY helpful - thank you! I tend to skimp on allowance and it has come back to bite me exactly as you say, by fraying and just overall not being hoop friendly. Even though I'm more mindful these days, seeing your photos is a great reminder.
Actually this whole series has been very helpful. I find piecing tedious too (weird coming from someone who is also a 'sane' quilter, I know! I adore the geometric results, not the process) so I may take up your idea of using one block for each of my CQ Journal Project blocks. You're right that once trims are added you can't really tell.
What a great idea to have the block templates in various sizes - so much quicker. Its nice to have all the blocks completed to the point where you just have to pick them up and start stitching. I have all my American Songbirds blocks done to that stage although I haven't had time to stitch on them lately. I hope to get back to them soon. Thanks for taking the time to document your process - I figure I'm never too old to learn.
Very well explained and something I will start doing....I like the idea of the inner basted line.
xo,
Deb
Best advice I have ever read re CQ. Wish I had read it a long time ago. Thank you.
Your tips and experience is a wealth of wonderful information for someone like me who is fearful to even attempt piecing or CQ. Thank You very much. Blessings Dear...
Post a Comment